
The sun is down, and your light bar is on illuminating the back-country trails when suddenly your light bar goes out. You quickly glance down at your switch panel and the illuminated light bar switch says its on. So, you flip the switch off, and then back on but your stock headlights are still the only light lighting up the trail. You quickly update your navigation app to route you back to camp. This has happened to a lot of us so we will quickly walk you through the basic steps needed to test your LED light bar.
The first step in testing your LED light bar is the power source since the absence of power would not allow your light bar to operate.
In this case, the power source on your vehicle will be your vehicles battery. Pop the hood and check your battery for the following:
- Age of battery: How old is your battery? There is a chance that your battery may not be able to provide enough power to your light bar which will cause your light bar to not turn on. You can test your battery with a multi meter to make sure you’re your battery has 12 volts when not running and around 14 volts when running.
- Battery Connections: Loose battery connections can restrict the amount of power to your vehicle and your light bar. Any battery terminal that can be turned by hand should be tightened to your vehicles manufactures specifications.
The second step involves inspecting all aspects of the LED light bar wiring harness.
- Light bar power and ground: Locate the power and ground connections for the light bar and make sure they are firmly connected and show no evidence of corrosion.
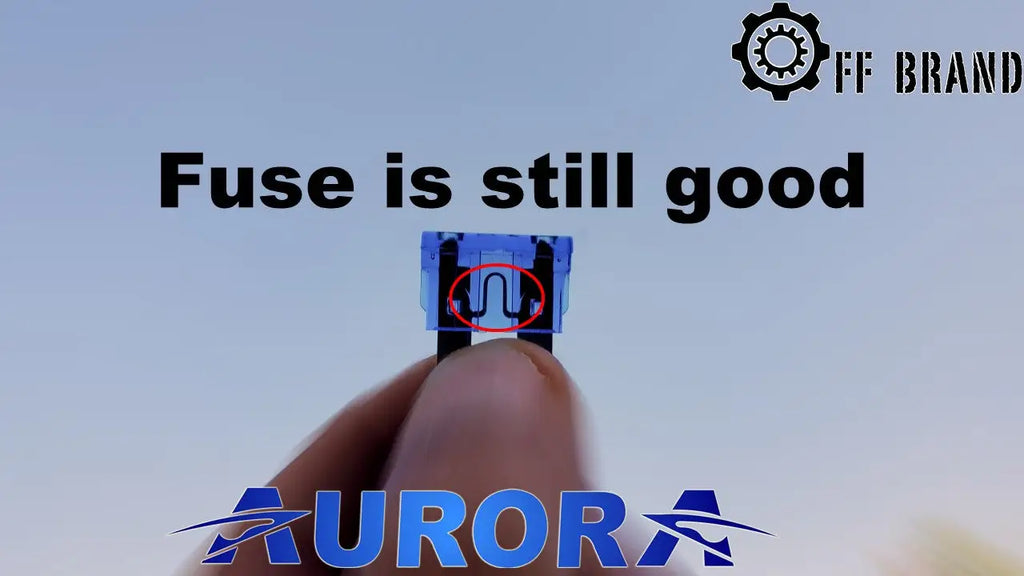
- Light Bar Fuse: If you have an Aurora LED light bar it will be equipped with a waterproof inline fuse. Open the fuse holder cover and remove the fuse. Hold the light bar fuse to a light source to inspect the metal conductive strip confirming that it has not blown. If you determine that the light bar fuse is bad, then replace it with a light bar fuse that has the same rating. You will also need to take a deeper dive to understand what caused the light bar fuse to go bad.
- Checking the Relay: All Aurora light bars are equipped with a 12-volt light bar relay and some Aurora Light bars have a 24-volt relay. First thing you should do is check for obvious physical damage like a melted relay, corroded terminal ends, etc.
- The easiest way to test a relay is to replace it with another relay that you know is in working order. If you have a spare light bar relay, then use that to see if the problem is solved and move on to the next step if you determine that the light bar still doesn’t function. Since the light bar relay contains a mechanical switch that completes the circuit you can place your finger on top of the relay and then press the light bar switch on and off. If the light bar relay is working, you should feel and possibly hear the switch inside the light bar relay complete the circuit.
- Checking the Light Bar Duetsch Connectors: Unplug your light bar connector from the light bar as you are going to be checking the male terminals of the light bar wiring harness. In order to successfully complete this test, you will want the light bar switch to be turned on.
- With the light bar switched on you will want to test the power wire on the male Deutsch connector for 12v power. Once power is confirmed you will want to complete the same test on the other terminal to confirm that a ground connection is present.
If you have completed all the steps above and you still can't figure it out then you may have a defective light bar. if you were lucky enough to purchase an Aurora LED light bar then you will most likely be covered by the manufactures warranty.
Still Have questions? Then feel free to reach out to us.
Phone: (484)-513-7746 (Accepts Text)
E-mail: support@offbrandproducts.com
Online Chat: Click the online chat button.